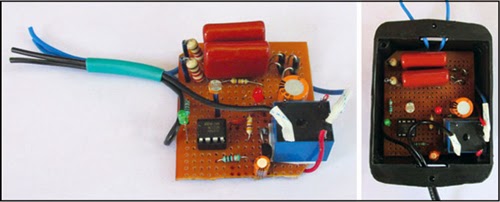
Presented here is a solution for switching off outdoor lamps even when you are not at home. The lamp turns on in the evening and turns off in the morning so that there is no need for manually switching it on/off. The circuit is directly powered from AC mains and can be enclosed in a plug-in type adaptor box. It can drive a bulb, CFL, tubelight, LED lamp, etc up to 200W. Author’s prototype is shown in Fig. 1.
Circuit and working

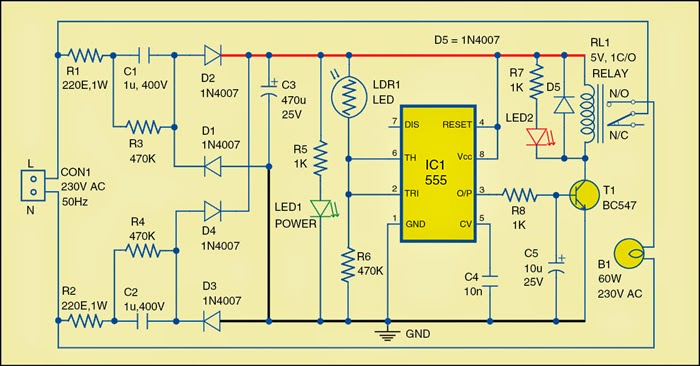
The circuit uses a transformer-less power supply to generate low-volt DC. As capacitors C1 and C2 are connected in AC lines, these should be X-rated capacitors. This minimises space and makes the unit light-weight. Unlike an ordinary capacitive power supply, a more efficient power supply design is used for spike-free operation. Phase (L) and neutral (N) lines have identical circuits so reversal in polarity while plugging will not affect the circuit. 105K (1µF) 400V AC capacitors are used that can drop 230V AC to low-level AC. Resistors R1 and R2 protect the power supply from instant inrush current. Bleeder resistors R3 and R4, parallel to C1 and C2, remove the stored current from the capacitors at power off to prevent shock from stored energy in the capacitors.
A full-wave rectifier bridge comprising D1 through D4 (1N4007) rectifies low-volt AC to DC and smoothing capacitor C3 gives ripple-free DC for the circuit. The output voltage from the power supply is sufficient to operate the circuit including the relay. Green LED1 indicates power-on status. Resistor R5 limits LED current.

The circuit is a simple bi-stable arrangement using popular timer IC 555 (IC1). ing its threshold (pin 6) and trigger (pin 2) controls its flip-flop operation. When the threshold input is high, it resets the flip-flop and keeps the output low. When the trigger input is low, flip-flop triggers and output turns high. So the combined action of threshold and trigger inputs gives the bi-stable switching action to control relay driver transistor T1. The bi-stable action of IC1 is controlled by LDR1 and resistor R6 (470k). The value of 5mm LDR can be up to 1 mega-ohm, depending on the ambient light conditions. A 1MΩ variable resistor in place of R6 can make the sensitivity adjustment easy.
During day time, LDR1 has low resistance, which makes threshold pin 6 of IC1 high. This resets the timer and the output of IC1 remains low. It takes transistor T1 to cut-off state. The relay is de-energised, so the lamp remains off during day time.


When the intensity of sunlight reduces in the evening, LDR1 offers more resistance and the current through it ceases. This makes both threshold and trigger inputs of IC1 low and the timer changes its output to high. Transistor T1 is switched on due to saturation action. The relay is energised, contact change-over takes place and line is extended to bulb B1. As the circuit is complete, the bulb will be switched on. It will remain lit throughout the night.

In the morning, the situation will get reversed; threshold pin 6 and trigger pin 2 go high, timer reverses its output. Transistor T1 goes into cut-off region. The relay will be de-energised and the bulb will get switched off.
Capacitor C5 at the base of transistor T1 gives a slight lag during on/off of T1 for the clean operation of the relay. Freewheeling diode D5 eliminates back EMF from the relay coil and protects T1 during its switch off. Red LED2 indicates the actuation of the relay.
Construction and testing
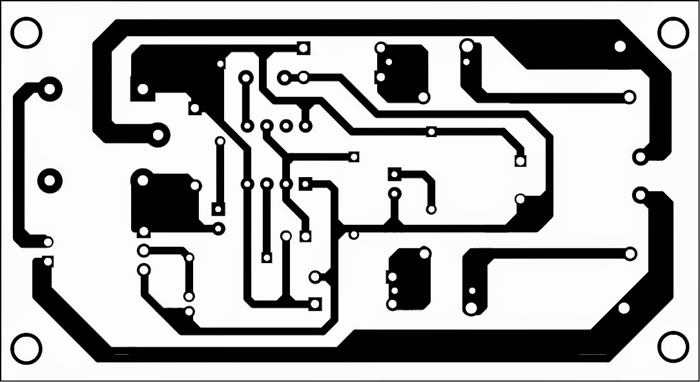
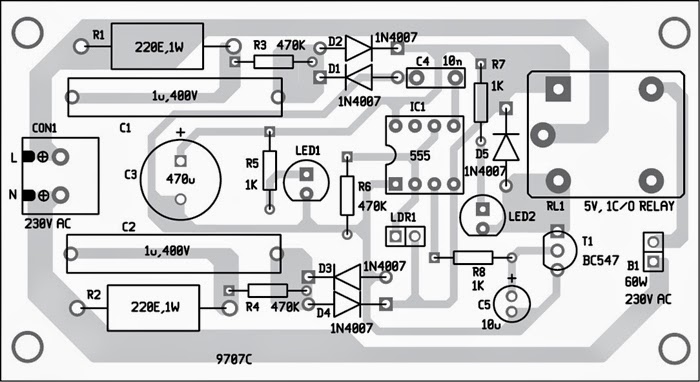
An actual-size, single-side PCB layout for the automatic evening lamp is shown in Fig. 3 and its component layout in Fig. 4. After assembling the circuit on a PCB, enclose it in a suitable plastic case.
Give sufficient spacing between the power supply section and the remaining circuit. Provide holes on the front side of the enclosure for LEDs and LDR. Connect phase line (L) to the common contacts of the relay and neutral line (N) for the bulb to the N/O (normally open) contacts of the relay. A 5V PCB relay is used. Ratings of the relay must match with the load. Since the circuit is directly powered from high-volt AC, extreme care is necessary during testing.
First assemble the power supply section up to green LED and connect to AC lines. If the green LED turns on, power supply section is alright. After disconnecting the circuit from mains, assemble the circuit around IC1. Test this part using a 9V battery connected across capacitor C3. If relay RL1 energises after masking LDR1, the bi-stable section is working.
Now the relay connections can be done. Keep the unit outdoor in a place where sufficient light is available. Light from the lamp should not fall on LDR1.
Caution. Since this circuit has mains voltage on board, extreme precautions need to be taken. Do not troubleshoot when it is connected to the mains. Test only after taking adequate precautions to prevent shock hazards.
Circuit and working

Fig. 1: Author’s prototype
A full-wave rectifier bridge comprising D1 through D4 (1N4007) rectifies low-volt AC to DC and smoothing capacitor C3 gives ripple-free DC for the circuit. The output voltage from the power supply is sufficient to operate the circuit including the relay. Green LED1 indicates power-on status. Resistor R5 limits LED current.

Fig. 2: Circuit diagram of an automatic evening lamp
The circuit is a simple bi-stable arrangement using popular timer IC 555 (IC1). ing its threshold (pin 6) and trigger (pin 2) controls its flip-flop operation. When the threshold input is high, it resets the flip-flop and keeps the output low. When the trigger input is low, flip-flop triggers and output turns high. So the combined action of threshold and trigger inputs gives the bi-stable switching action to control relay driver transistor T1. The bi-stable action of IC1 is controlled by LDR1 and resistor R6 (470k). The value of 5mm LDR can be up to 1 mega-ohm, depending on the ambient light conditions. A 1MΩ variable resistor in place of R6 can make the sensitivity adjustment easy.
During day time, LDR1 has low resistance, which makes threshold pin 6 of IC1 high. This resets the timer and the output of IC1 remains low. It takes transistor T1 to cut-off state. The relay is de-energised, so the lamp remains off during day time.

Fig. 3: Actual-size PCB layout of an automatic evening lamp

Fig. 4: Component layout of the PCB
When the intensity of sunlight reduces in the evening, LDR1 offers more resistance and the current through it ceases. This makes both threshold and trigger inputs of IC1 low and the timer changes its output to high. Transistor T1 is switched on due to saturation action. The relay is energised, contact change-over takes place and line is extended to bulb B1. As the circuit is complete, the bulb will be switched on. It will remain lit throughout the night.

In the morning, the situation will get reversed; threshold pin 6 and trigger pin 2 go high, timer reverses its output. Transistor T1 goes into cut-off region. The relay will be de-energised and the bulb will get switched off.
Capacitor C5 at the base of transistor T1 gives a slight lag during on/off of T1 for the clean operation of the relay. Freewheeling diode D5 eliminates back EMF from the relay coil and protects T1 during its switch off. Red LED2 indicates the actuation of the relay.
Construction and testing
An actual-size, single-side PCB layout for the automatic evening lamp is shown in Fig. 3 and its component layout in Fig. 4. After assembling the circuit on a PCB, enclose it in a suitable plastic case.
Give sufficient spacing between the power supply section and the remaining circuit. Provide holes on the front side of the enclosure for LEDs and LDR. Connect phase line (L) to the common contacts of the relay and neutral line (N) for the bulb to the N/O (normally open) contacts of the relay. A 5V PCB relay is used. Ratings of the relay must match with the load. Since the circuit is directly powered from high-volt AC, extreme care is necessary during testing.
First assemble the power supply section up to green LED and connect to AC lines. If the green LED turns on, power supply section is alright. After disconnecting the circuit from mains, assemble the circuit around IC1. Test this part using a 9V battery connected across capacitor C3. If relay RL1 energises after masking LDR1, the bi-stable section is working.
Now the relay connections can be done. Keep the unit outdoor in a place where sufficient light is available. Light from the lamp should not fall on LDR1.
Caution. Since this circuit has mains voltage on board, extreme precautions need to be taken. Do not troubleshoot when it is connected to the mains. Test only after taking adequate precautions to prevent shock hazards.
Sourced By: EFY: Author: D. Mohan Kumar
Comments
Post a Comment